Data Version Control (DVC) is one of the most amazing projects in recent years. Before using it, we used to have trouble reproducing our models and experiments. We store our images and annotations in high-volume network attached storage where multiple people work every day, so there was no proper way to modify images or annotations while maintaining a correct and reproducible change history. You can imagine how often someone accidentally deletes an image, modifies some annotations, or infinitely more random problems that ended in trouble for properly reproducing our experiments.
In this post I will try to show how to configure DVC and how it can help us to maintain version of our datasets that can be easily integrated with Github.
Why DVC?
The first thing we should do is understanding how DVC works, we can check its landing page which contains some intuitive explanations:
- Machine Learning projects are defined by code and data
- We know how to track code using git
- DVC main target is to built something similar to git for tracking data and models. It must be:
- Flexible
- Easy to learn
- Work with any ML framework
I always recommend to watch this introduction video that greatly summarizes the main idea behind this tool.
If you paid attention, you will probably have a general idea of how this large files are tracked. Light-weight files (.dvc files) are used as “pointers” to large files, so we can use git to track those pointers and then retrieve the associated large files in our local filesystem with dvc. In other words, you do not need to worry anymore about uploading large files to git (forget about LFS), DVC will handle everything for you once it is properly configured. That’s pretty cool isn’t it?
Setting up the environment
I have pushed all changes to a Github repository that you can consult in case you need.
Install DVC
Let’s setup DVC for our experiment. If you check their installation guide, you will realize that depending on the type of remote storage you plan to use, it might be necessary to install additional deps. For this tutorial we are going to use Google Drive because it is probably the most accesible to everyone. I always use Conda environment for Python package management, do the following for creating a new environment and installing dvc on it:
conda  create -n coco_sample python=3.8 -y
conda activate coco_sample
pip install dvc[gdrive]
Get the data
We are going to use a subset of the COCO dataset created by fast.ai. The fast.ai subset contains all images that contain one of five selected categories, restricting objects to just those five categories; the categories are: chair couch tv remote book vase. You can download and extract it using the following commands:
wget https://s3.amazonaws.com/fast-ai-coco/coco_sample.tgz -P data
tar zxvf data/coco_sample.tgz -C data
rm  data/coco_sample.tgz
You should now have all images in data/coco_sample/train_sample and their corresponding annotations in data/coco_sample/annotations/train_sample.json
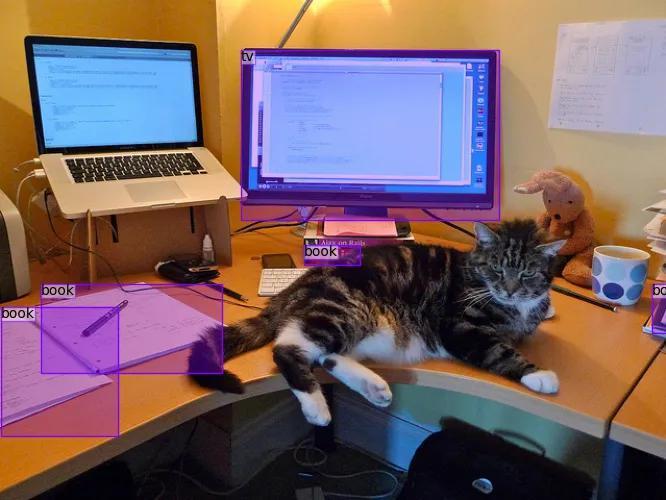
Visualize our data
It is always good to take a look at the data to get an idea of what kind of images we are dealing with. We are going to use our tool pyodi, which allows us to retrieve annotations from a COCO formatted file and paint then over the corresponding image. We can install it using pip and run the paint-annotations script pointing to our data and annotations folder:
pip install pyodi
pyodi paint-annotations data/coco_sample/annotations/train_sample.json data/coco_sample/train_sample output/painted_images --first_n 10
This will paint the first 10 images of the dataset and save them into output/painted_images folder.
Version the data
If we follow DVC get started page, we need to initialize the project running dvc init so let’s run that first and commit those internal files to github.com
git init
dvc init
git commit -m "Initialize DVC"
Let’s now add our data and annotations to DVC.
dvc add data
This may take a while since it needs to compute hashes for all files in our data directory. Two files are generated, the .gitignore that will inform git that it must ignore the data/ directory and data.dvc, a small text file in a human-readable format used by dvc to track changes that we can upload to git. Let’s add can add this files and commit the new changes.
git add .gitignore data.dvc
git commit -m "Added data to dvc"
Last step will be to configure our Google Drive remote. For this, I created a new folder in my personal gdrive called dvc_data so you should do the same in your own gdrive. After that I will add that folder as a dvc remote and I will need to grant DVC the necessary permissions to access my gdrive account. This can be easily done after running dvc push following the link that promts when running the command. Have in mind that the push step may take a while to complete depending on your internet connection.
dvc remote add -d gdrive-remote gdrive://root/dvc_data
git commit .dvc/config -m "Configure local remote" # Commit changes to git
dvc push # Upload data to gdrive
We are now tracking our images and annotations with DVC and have pushed it to our google drive remote storage.
Split the data
We have a file train_sample.json that contains all our annotations. We need to split this file in training and validation subsets so we can properly train our model in a near future. We are going to use pyodi’s coco random-split app for this task, since it is very easy to execute.
Let’s reserve a 20% of the total data for validation:
pyodi coco random-split data/coco_sample/annotations/train_sample.json data/coco_sample/annotations/split --val-percentage 0.2
This creates two new files split_train.jsonand split_val.json. Let’s add them to dvc, that will magically recognize that we have only added two new files, and commit changes to git:
dvc add data/
git commit data.dvc -m "Add dataset splits"
dvc push
Tag our data with versions
You must bear in mind that if we now move through our git history, we can also retrieve the state of our data in that commit or specific moment thanks to DVC. Anyway, I always like to tag the versions of my dataset so that I can easily understand what the state was at all times. Let’s do this now and tag the initial version of our dataset and push our changes to github.
git tag -a "v1.0" -m "Initial version, fast.ai COCO subset. 0.2 validation split"
git push --tags
Let’s imagine that for any reason we need to create a new version of our dataset saving only ten percent of our data as validation. We could simply run pyodi, override our actual annotations and push the new changes without fear to loose any data. Let’s try that:
pyodi coco random-split data/coco_sample/annotations/train_sample.json data/coco_sample/annotations/split --val-percentage 0.1
dvc add data/
git commit data.dvc -m "New split with 0.1 validation"
dvc push
git tag -a "v2.0" -m "0.2 Validation split"
git push --tags
That’s it we now have two version of our dataset. If we want to move to our previous version we can simply run:
git checkout v1.0
dvc checkout
Continuous Integration for data
We have used DVC for track and save data the same way we do with code. So we can also add some test to our data to make sure that we do not commit any error that can harm our training. Since we have used Google Drive as a remote storage for our data, we can configure our CI pipeline to download our data from there and run our tests.
First of all we need to store our gdrive credentials as a Github secret. You can go to you repository settings in Github and create a new secret named GDRIVE_CREDENTIALS_DATA, and paste there the contents of your .dvc/tmp/gdrive-user-credentials.json. This file should have been automatically created after you give DVC permissions to your Google Drive account. You can read more about this in DVC documentation.
Let’s create an example test in charge of checking that our annotations follow COCO format guidelines. We can use pydantic for data validation defining how annotation should be using python type annotations. We now for example that categories or our dataset can only take six different values and bounding boxes must be a list of four integers. Pydantic allows us to define this rules in a very efficient an flexible manner.
Create a new file tests/test_annotations.py and paste the following content:
import json
from pathlib import Path
import pytest

from typing import get_args, List, Literal
from pydantic import BaseModel, conint, confloat, conlist

CATEGORY_NAMES = Literal["chair", "couch", "tv", "remote", "book", "vase"]

class COCOCategory(BaseModel):
    id: int
    name: CATEGORY_NAMES


class COCOImage(BaseModel):
    id: int
    file_name: str


class COCOAnnotation(BaseModel):
    image_id: int
    bbox: conlist(int, min_items=4, max_items=4)
    category_id: int


class COCODetectionDataset(BaseModel):
    images: List[COCOImage]
    annotations: List[COCOAnnotation]
    categories: List[COCOCategory]


@pytest.mark.parametrize("split", ["train", "val"])
def test_coco_format(split):

    annotations_file = f"data/coco_sample/annotations/split_{split}.json"

    with open(annotations_file, "r") as f:
        dataset = COCODetectionDataset(**json.load(f))

    # Check image ids are unique
    image_ids = [img.id for img in dataset.images]
    image_ids_set = set(image_ids)
    assert len(image_ids) == len(image_ids_set)

    # Check annotation ids are unique
    categories = [cat.id for cat in dataset.categories]
    categories_set = set(categories)
    assert len(categories) == len(categories_set)

    # Check each annotation corresponds with existent image
    for annotation in dataset.annotations:
        assert annotation.image_id in image_ids_set
Note we added a test that will ensure that:
- Loaded data is validated with pydantic
- Image ids are unique
- Category ids are unique
- All annotations are associated with an existent image id
We have the test so we need to define a workflow that automatically runs this when we push some changes to our main branch. Create a new file .github/workflows/ci.yaml and paste the following code:
name: Continuous Integration

on:
  push:
    branches: [main]

jobs:
  test:
    runs-on: ubuntu-latest
    steps:
      - uses: actions/checkout@v2
      - uses: iterative/setup-dvc@v1

      - name: Get annotations from dvc remote
        run: dvc pull data/coco_sample/annotations
        env:
          GDRIVE_CREDENTIALS_DATA: $

      - name: Run tests
        run: |
          pip install pytest pydantic
          pytest tests
This script is very intuitive. First we checkout our repo and setup DVC. After that we pull just the annotation files using using the command dvc pull data/coco_sample/annotations. Think that if we run dvc pull without extra argument we would have to wait before all images are downloaded and we do not need them for this type of test.
If we add, commit and push all this changes to Github we can see how our workflow triggers and runs the associated job:
git add .github tests
git commit -m "Add tests"
git push
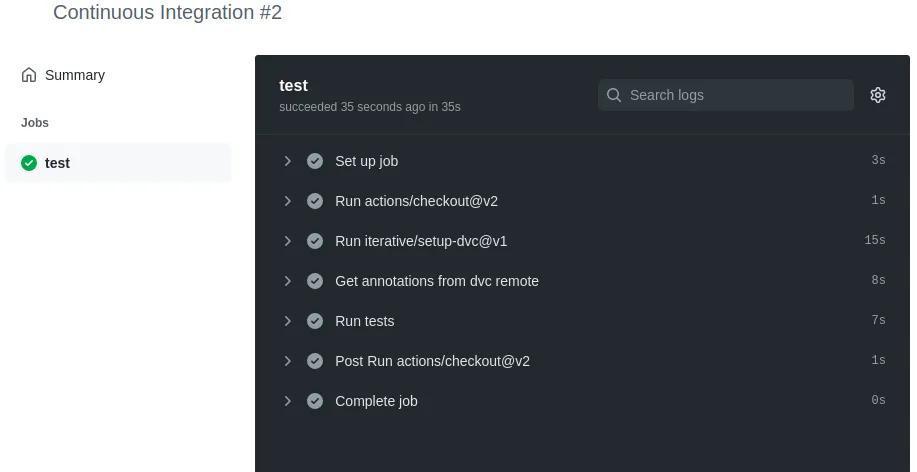
That’s it! Our test completed successfully!
Conclusion
DVC help us to keep version of our data and models. In this short post we have learnt a few things:
-
We have learned how to setup DVC and add a Google Drive remote
-
We have pushed our data to the DVC remote and tagged different versions of it
-
We have added some simple tests for our data and how to set up a CI worflow that runs on Github servers.
Any ideas for future posts or is there something you would like to comment? Please feel free to reach out via Twitter or Github